New Look Autumn/ Winter 14 Collection Preview

Although it feels like it barely passed, AW is upon us again and summer is very nearly over. It’s my favourite time of year for fashion and I’m so excited for the brand new array of coats, boots and evening outfits to hit shop floors this September. I was lucky enough to attend the Autumn Winter 2014 New Look Press Event back in May and am so excited to show you some exclusive pictures of their new collection and key trends for this Autumn/Winter.

New look autumn winter 2014 collection New look autumn winter 2014 collection New look autumn winter 2014 collection New look autumn winter 2014 collection New look autumn winter 2014 collection New look autumn winter 2014 collection

The peep toe trend has officially come full circle. From being a trend synonymous with the 1940’s, it has made its way through the designer circle and slipped down in to the high street stores, with New Look taking it under their wing, displaying some lovely peep toe options. The cut out detailing and the buckle make this peep toe boot rather biker-ish, and the simpler sleek mules, reference a SS14 Whistles pair, at a much more affordable price. Both can be easily teamed with skinny jeans and a casual top for a stylish day time outfit.

New look autumn winter 2014 collectionNew look autumn winter 2014 collection

Similar to the Topshop jumpsuit we have all seen this season, which comes in black, pink and white – New Look have done their own (and hopefully slightly cheaper) version. Again symbolising a classic Whistle’s design from the SS14 season, the jumpsuit is strapless, fitted and with a straight leg. On the back there is also an oval cut out shape, but avoids the no bra dilemma by still keeping a band on the back.

Fotor090713491 - CopyIf you fell in love with the 90’s this season, like I definitely did with Iggy Azeala’s Fancy video and Kylie Jenner’s make up, then there is something for you here. This shoe and bag combo screams the 90’s. The low chunky heel and pointy top is something you’ll definitely see on the feet of the women in the films Sliding Doors or American Beauty! And the check detailing of course relating to Iggy’s take on the Clueless outfit.

New look autumn winter 2014 collection

Just because winter is here, it doesn’t mean you have to throw your pastels away and move to dark reds and purples. By combining some texture, New Look has created the winter pastels. I’m not sure how confident I would be carrying the pink fluffy tote bag just yet, but can see a more stylish person carrying it off perfectly. The suede texture on the shoes and the leather crocodile skin effect on the bag also make this pastel blue a staple winter edition.

New look autumn winter 2014 collectionNew look autumn winter 2014 collection


Do you have your eye on anything in this collection? I know I do…


MU EDIT

Clean and Clear Deep Action Cream Wash – The Worst

Deep Action Cream Wash

By name, Clean & Clear is designed to cleanse the skin and clear it. By nature, it does the opposite.

I have never been so badly and so quickly affected by a new product. Sometimes when you try a new product, you notice that your skin hasn’t reacted well towards it after a few days, so you stop using it and everything goes back to normal. I wish that was the case this time..

I bought Clean and Clear Deep Action Cream Face Wash on a whim. Sainsburys were offering 3 for 2, and as I was already buying 2 other items, I thought why not? I have been hoping to get a face wash that I could use in the morning, just to get any left over dirt or sweat from my face that may have developed in the night. 

My first experience of using this face wash wasn’t too bad. It tingled my skin a bit, but I naively thought that just meant it was working. I continued to use it for two days/ three maximum, until my skin became really just sore and dry and I developed loads and loads of tiny, sore spots. I am emphasising the word sore because I have never experienced anything like it, my skin felt so tight and when I spoke the skin on my chin would hurt. The only way I can describe the feeling is as if somebody threw acid on my chin or it was really badly sunburnt.

It was a nightmare to put foundation on, as nothing sat well with it and I couldn’t wait to take my make up off at the end of the day (more than usual) because I felt I needed to press cold water on it and allow my skin to breathe. I have completely stopped using it now, obviously, and hope that my skin will clear up soon. It has been 3 days since I have stopped using it, and I have seen mild improvements. 

I don’t like writing negative reviews. But I wouldn’t be an honest blogger if I didn’t. Sometimes I feel too pushy though, as this could have been a nightmare for me, but could be somebody else’s holy grail product on their skin. For me, it definitely isn’t. So I just want to say beware! I don’t have particularly sensitive skin, but boy can you imagine if I did…


makingup xo

My Daily Make Up Routine


ImageImage

My every day make up routine is perhaps not as extensive as I would like to be, as I often prioritise sleep over getting ready in the morning. I see girls at university sometimes dressed to the nines in fashionable clothes and a full face of make up and I just look at them and think, you look lovely, and I could look like that too, but it’s 10am in the morning and I just don’t have time…

It’s also quite funny because a lot of my lectures don’t begin until 1 or 2 in the afternoon… and that sentence will still apply, but lets not talk about that..

I usually don’t do much to my face in the morning skin care wise as I have quite a thorough night time routine and don’t want to dry my skin out or take away too many natural oils!

 1/ Oilatum Natural Repair Face Cream – I first heard about this moisturiser from Nic from Pixiwoo who absolutely swears by it. I wouldn’t say I swear by it, but I hate fragranced overpriced moisturises, I often find things like this work the best for simply deeply moisturising the skin. Which is why I love E45 for the night time, that I definitely swear by. However – it is a good day moisturiser as it really does moisturise, without being too heavy and so it’s easy to apply make up over the top without my foundation sliding all around my face! You only need a pea sized amount for your whole face and it only costs about £7 too! Bargain!!

2/ I usually use Neutrogenas Lip Balm on my lips, but I have run out of that at the moment so I’m using Vaseline’s Paint the Town Red EditIon lip balm. It doesn’t moisturise as well as Neutrogena’s and I mainly use it because it gives a really nice red tint to the lips, which makes them look so fresh and healthy.

3/ Lasting Perfection Collection Concealer – I don’t really need to explain this one do I? Every beauty blogger I know has tried and loved this. It costs about £4.99 and is by faaar the best concealer I have ever used. I normally use it to cover any redness or spots, but sometimes if I want a heavier coverage, I will use it all over my face which gives me a flaw free complexion without it looking cakey.

4/ L’Oreal True Match Foundation in N1 – A lovely medium – full coverage foundation, that has a really thin moisturiser so it doesn’t look cakey at all. It blends really well and the great colour range means you are sure to find your exact colour match. It has a natural finish, which I love and good staying power throughout the day – although I use a different one during the night as I find it can move sometimes when I sweat/ dance/ all the other things you do when you’re out and intoxicated..

 5/ ….I apply it with my Real Techniques Expert Face Brush which should be a staple item in everybody’s make up bag. It has soft but very dense bristles, which spread foundation evenly and give a flawless full coverage. Real Technique brushes have been a revelation to the high street beauty market over the past couple of years and I am excited to see where they go in the future.

6/ Eyebrows Eyebrows Eyebrows. My love. I thrive off having good eyebrows, they really make a difference between a good and a bad day for me. I found a good shade for me in the Big Beautiful Eyes Benefit palette, it doesn’t have a name but it is simply a matte dark brown which I’m sure you can find anywhere.

7/ Rimmell’s Stay Matte powder is definitely a holy grail product. I have never, and will never use anything else. It locks in my make up all day and the powder is so refined, it doesn’t look cakey at all no matter how much you apply. The best thing about it is, it costs about £3.99!

8/ …I apply this with a Mac 187 brush in stipiling motions. I like a full coverage, and using a face powder brush just doesn’t give me the coverage I want. I also find it easier to lock my make up in place using this brush and the stippling method, as some face powder brushes can wipe your foundation away.

9/ Another holy grail product of mine, L’Oreal’s Telescopic Mascara. I would say this is similar to Benefit’s They’re Real Mascara, but less clumpy. The applicator is very thin with rubber bristles, that really helps my lashes to separate and look long. I have tried other products and nothing compares – I could never see myself using anything else!

10/ I haven’t been using Nars’ Laguna for very long. And I have mixed reviews on it. For the day time, with the paler foundation and generally less make up that I use, I find it a bit too orange toned. Especially as I like to contour rather than bronze, this isn’t always ideal. However for the evening it’s great, especially when I use my darker toned foundation. I’m still unsure and on the hunt for the perfect contour shade though, especially as I’m still grieving over Benefit discontinuing no.10 which was my ultimate highlight and contour, and probably my favourite product ever!


What do you use for every day make up? Can you recommend an amazing brown toned contour for me please!?

makingupxo

Oh My Love Fishnet LBD

ImageImageImageImageImageImageImageImageImage

Oh My Love has done it again. They somehow just continually get it right for me when it comes to LBD’s. Bought on a whim during their sale, I thought afterwards that I might regret it. The very plunging neckline is not me at all, and I will definitely need to invest in some sort of keep-everything-in-place-sticker-bras as there is no way I can get away with wearing a bra with this dress!

With the flash sale, and a very generous discount code, the dress only cost me £12.50 (inc p+p) and as it’s RRP was £39. How could I say no?

Just a heads up on Oh My Love’s sizing as in dresses I am normally an 8, which usually correlates to a small but in Oh My Love I seem to always be an XS (feel good factor moment!) so I would suggest if you’re not sure, and can’t afford to buy 2 dresses and send one back – go for the smaller size!

The fishnet details are key this season, with the Nicole x Miss Guided collection sporting it on almost every dress.

I’m still yet to wear it out – and I will definitely post pictures when I do. But I am thinking I would team this with either simple black heels, and a black studded clutch OR grey/beige shoes, and grey clutch.

I would try not to overdo it with accessories and make up, and I would definitely stay away from a red lip, which with the fishnet detail could make you look more stripper than sophisticated sexy!

 What bargain have you recently picked up?

making up xo

URBAN DECAY NAKED 2 DUPE | MUA UNDRESS ME TOO

ImageImageImageImage

My love for MUA is ever growing, alongside Collection 2000, it is quickly becoming one of my favourite affordable high street beauty brands. After loving their £1 nail polish, (which really does work) I tried their £4 eye shadow palette in Undress Me Too. The palette consists of 12 eye shadows, each one a dupe for the corresponding one in Naked 2. I didn’t realise when I first got it, but it really is such an amazing dupe for Urban Decay’s Naked 2, at an unbelievably cheap price.

Here are some swatches below:

Some are very slightly off, but mostly the colours are exactly the same.The only difference I would say is the quality, with MUA’s shadows having slightly grainier texture and UDN2 being a lot smoother and pigmented. But this is expected considering the price difference. Other than that – if you love the colours in UD and don’t want to spend £36 this is such a good option at a fraction of the price!

Overall I’m glad I have this product – even if I have an almost identical palette, as I get so protective over my Naked palettes when I travel – that this is the perfect travelling alternative.

Do you know any dupes? I want to know! Tweet me: @making___up

LAURA MERCIER SILK CREME FOUNDATION REVIEW

Image

Image

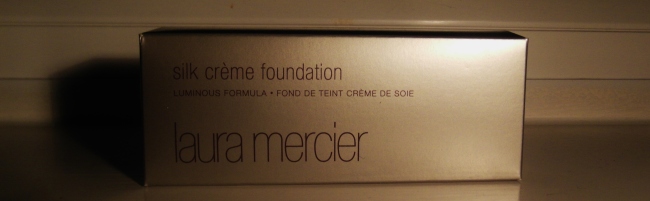
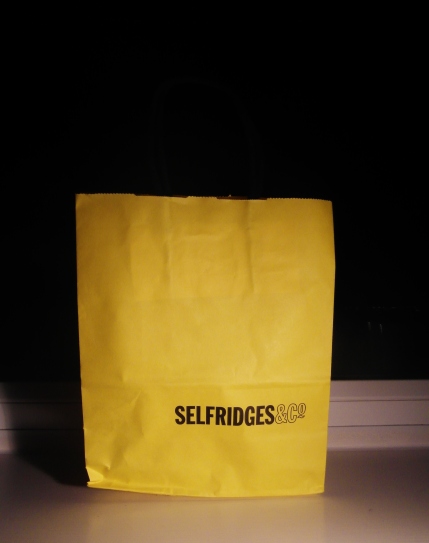
After a 5 year relationship with MAC’s Studio Fix Fluid I was becoming more resentful towards it and felt like it was time to break away and try something new. I had heard so much about Laura Mercier Silk Crème Foundation and so after watching countless YouTube videos, I decided to take the plunge and got colour matched in Selfridges.

Image

I find colour matching foundations really difficult for my skin tone as I am pale and have red hair, but I don’t have that porcelain/ blue undertone to my skin, and I think peach/rose undertones are really unflattering on me and often leave me with an orange toned face. I much prefer yellow undertones in foundation as you can go quite light, but still have a warm, glowing undertone. Shall I say undertone one more time?

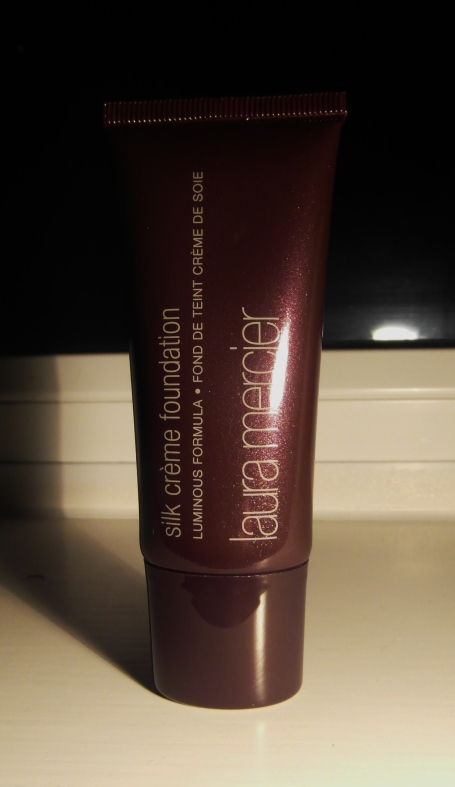
One of the good features about Laura Mercier Silk Crème Foundation is that the 4 lightest shades all have different undertones – it doesn’t just jump from 1) light to 2) medium etc like some foundations. The colours that are included in the lighter shades are, Soft Ivory, Cream Ivory, Rose Ivory and Peach Ivory. Soft Ivory seemed waay too light and would completely wipe any colour from my face, Rose Ivory was too pinky undertoned, and Peach was too orangey undertoned – so I was happy when I saw that they did a light colour with golden (yellow) undertones in the form of Cream Ivory.

The lady colour matching me said it was the fullest coverage foundation they do, but that it is classed as medium coverage but buildable. When I tried it at home however I would definitely say it is a full coverage foundation as one ‘coat’ completely covered my freckles and any blemishes I had – I also checked on the website and it comes under full coverage, so I guess the lady got confused……

Image

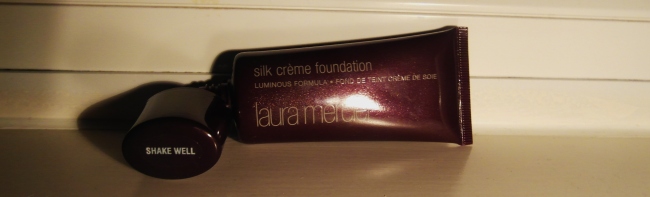
Despite Laura Mercier Silk Crème Foundation being a water based foundation, the formula is very gel-like and is quite a thick consistency. At £33 the foundation is quite expensive, but a pea sized amount covered my whole face so I imagine the bottle will last me a while.

This post is going to be in two sections, one of my thoughts after the first few days wearing the foundation and secondly after two weeks. They change a lot.

MY FIRST IMPRESSIONS

Full coverage without using concealer underneath was exactly what I wanted and exactly what I got.  It gave me a very natural finish, maybe verging a bit shiny – I definitely need to use a setting powder with this foundation.

Once I finished and completed my make up I was very happy with the results. I didn’t have to use a white concealar to bring the colour down (like I had to do with Studio Fix Fluid) and I didn’t have to ‘bronze up’ loads as it did not leave me with a white/ porcelain finish – but with an illumination healthy glow.

ImageImage

Image

When I went to work I got a compliment straight away saying my skin looks flawless so I was very pleased with that. Overall on the first few days, I was really happy with the foundation and would advise it to anyone who is looking for a high medium – full coverage foundation, with a natural finish, perfect for day and night. I would just say get colour matched properly because the different undertones really make a difference.

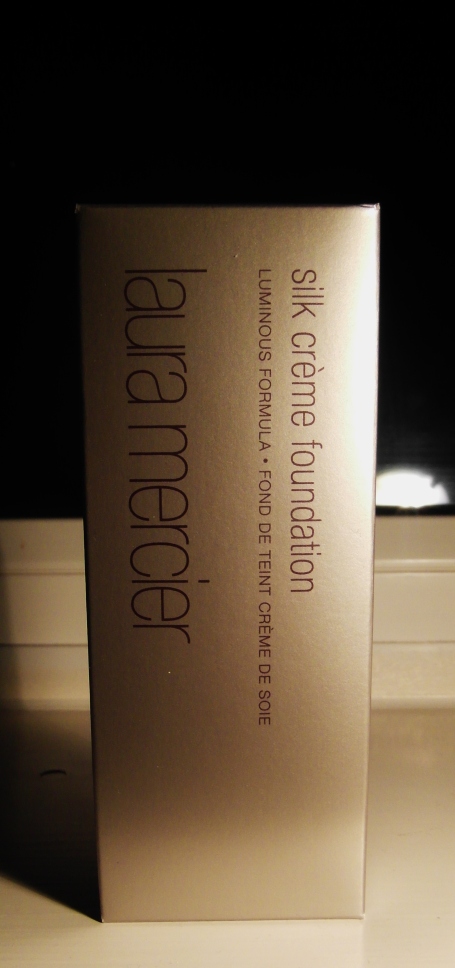
 One last thing – I reeally like the packaging of the foundation. It looks really sleek and the squeezy tube makes for a much better bottle than the glass ones with pumps you get, this makes it a lot handier for travelling.

OK – END OF FIRST IMPRESSIONS

SECOND WEEK

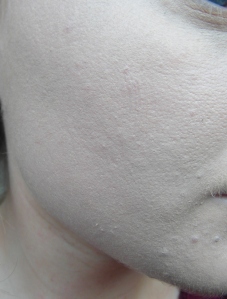
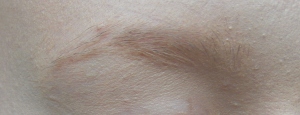
From using a thin consistency foundation such as Studio Fix, to going to a really thick- gel like foundation has been hard. I can definitely feel when I have Laura Mercier on my face, it feels quite heavy and you can definitely tell it’s foundation.  Also I have found that for some reason it really enlarges my pores, I guess the gel-like formula just doesn’t sit well in them as opposed to a proper liquid foundation. Which is odd because it is water based foundation. Lastly, I like a semi matte finish and I have to wear a lot of powder to set this foundation as it feels like it’s just going to make me look a bit sweaty. The powder doesn’t blend very easily into the skin, it sort of clings on to the foundation rather than letting it glide over meaning you have to use more. Also unfortunately, I have noticed that when I am not in direct sun light, it is actually quite dark. The photo’s below look like it is my exact colour match, because a big window is right in front of me. When I have looked at myself in the mirror at work or at uni, I think it is about half a shade too dark.

SAM_3962    SAM_3970 SAM_3973 SAM_3975

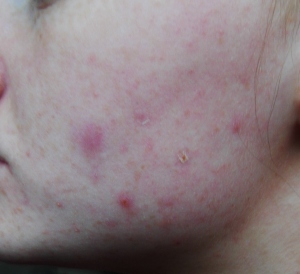
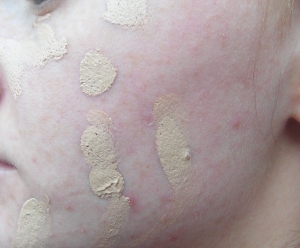
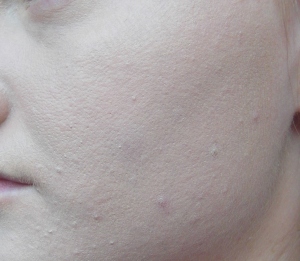
Before and after the foundation

HOWEVER, it’s not all bad, as I do think this would be a brilliant foundation for the evening when you want a fuller coverage and darker shade which I do need on a night out to avoid the flashback in photo’s that I can some times get.

I tried so hard to love this foundation as it was £33 and gets such good reviews, but I had to be honest and I didn’t love it!

I feel like there needs to be a better system of trying foundations because you just cannot tell properly in the store..

I am overall giving this foundation a slightly disappointing…

 awardd

Have you tried Laura Mercier Silk Crème Foundation – if so I want to hear your experience!? 

cropped-cropped-cropped-making-up1.jpg

EYEBROW TUTORIAL | BENEFIT BIG BEAUTIFUL EYES

Eyebrows are such a staple part of my look. I could go out with no foundation, no concealer and no mascara, but as long as I had my eyebrows on I would feel happy(-ish!)

I use Benefit’s Big Beautiful Eyes Palette, in the matte brown shade and a MAC 212 brush to complete my look.

Find out how I make this transition below:

SAM_3977

 SAM_3998

I’m quite lucky in the sense that my eyebrows are blonde and in the summer turn basically white, so I don’t need to thread them as much as some people. I used to get them done once a month but then I was thrown into the world of being a university student and having no money, so I usually get them done about 4 times a year, (around every 3 months.) A drastic difference I know! But I have realised that they don’t actually need them done that often – although these photo’s might tell a different story! On an everyday basis, you really can’t see the hairs. So here is a step by step guide to how I get my perfect eyebrow shape.

 1

Image

These are my brows with absoloutely no product on!! Shameful! They have minimal shape and are barely visible to the naked eye.

2

Image

I began using a powder to do my eyebrows just before Christmas, before that I used Rimmells eyebrow pencil Hazel for years. Yet I found using a powder gives a much more precise line and you don’t have to faff around with sharpening it etc.. Also I found that Hazel had quite an orange undertone, which was very visible in pictures with a flash especially. I didn’t particularly like that, so I tried a matte brown eye shadow that comes in the Benefit Brown Smoky Eye Palette and have continued using that since. I’m so annoyed that the picture below came out slightly blurred as I didn’t realise until I zoomed in on the computer. Aside from that, my first step is to draw the top end of my brow. I know a lot of people start with the bottom, but I find it easier to define an arch and control the shape by beginning with a line at the top.

3

Image

I then draw a line at the bottom to the desired shape, which creates the template to my eyebrow. I like an arch, but still a relatively straight and thick brow with a sharp point at the end. I also like for the point of my brow to be a lot darker than the beginning of my brow and this is an easy way to achieve that.

4

Image

With a light hand I drag the bottom line of the brow to the beginning, trying to get fainter and fainter as I do it.

5

Image

The next step is my favourite as you just colour in your brow!! Stop ‘colouring’ with a heavy hand about ¾ into your brow …

6

Image

Wipe some product of you brush, and gently do upward strokes from the beginning of your brow to create a less harsh finish.

7

Image

If you’re shape isn’t as precise as you would like it, a simple trick is to put a concealer/ highlighter underneath and maybe above your brow with a brush. This will stop any out of place lines or smudges from showing and give your eyebrow a flawless finish. (I haven’t blended my concealer in don’t worry!)

8

Image

My finished eye brow! Hope this helps, practice makes perfect so don’t be disheartened if it goes wrong.

Products I used:

  • Benefit’s Big Beautiful Eyes Palette – Matte Brown Shade
  • MAC 212 Brush
  • Collection 2000 concealer in #1 ‘Fair’
  • L’Oreal Telescopic Mascara
  • Laura Mercier Silk Creme Foundation in Cream Ivory
Whats your holy grail eyebrow product? Let me know in the comments or tweet me at @making___up

MISSGUIDED PVC INSPIRATION

MISSGUIDED INSPIRATION
Although I published some of my key winter trends a couple of weeks ago.. winter is a very long time in England and new trends are emerging all the time!  I have completely fallen in love with Missguided’s PVC selection. Topshop do a very similar skirt but Missguided are quickly becoming the online highstreet-go-to store, for their inexpensive but still on trend pieces.
You can dress PVC up or down, a cropped fluffy jumper is so on trend and makes the look more casual. But team the skirt with heels and a cropped top and you’re ready for a night out.
PVC used to be called the cheap and tacky material, but  I think this glossy look is classy and glamorous. It’s funny how trends and fabrics evolve, it reminds me of the leopard print transition, as it was once known for being cheap, but at one point not long ago, it completely took over the high streets, and it was definitely one of my favourite prints.
Give PVC try and let me know what you think, even better, tweet me a picture of you wearing your PVC item @making__up!

BARRY M GLITTER NAILS

ImageImageImage

I know I’m a little late but I really wanted to get these pictures up as I was really pleased with the way this nail varnish came out… It was Christmas and New Years and in my eyes, it’s illegal not to have those tacky – all out – glittery nails. Because in the words of Love Actually if you can’t say do it at Christmas, when can you eh?

I used Barry M’s 337 Nail Polish, simply called Pink Silver Glitter (£2.99), and I used 2-3 coats to get an opaque coverage. I got loads of compliments and people said they didn’t think they were tacky (but maybe they were just being nice?)

What do you think?